I spent a few nights and weekends over the past 5 months making an ASUS Chromebook Flip C302CA into an acceptable Linux laptop on a budget. If you're only interested in the post-Kubuntu-install tweaks, skip to The audio hack.
TL;DR: Remove firmware write protect screw, install full ROM replacement, install Kubuntu 19.04, build a newer kernel, and get the right firmware saved in the right places. (And use a mess of shell scripts to get the audio configuration to update when you plug in headphones, if you want.)
Easy, right?
The motivation
I have one of the notorious MacBook Air keyboards. I waited four whole years for Apple to fix their design, and I thought surely the third iteration of the butterfly switch would be more robust. Of course, I was wrong. I realized that if Apple can't be relied upon to produce an acceptable laptop keyboard for half a decade, I needed to get back into Linux. It's good to have options.
What's kind of funny is that I actually switched from Linux to macOS back in high school. That was around when I started writing software to actually do things, instead of just messing with my system configuration constantly. Having a system that was reasonably UNIX-y for web development and had working WiFi, Bluetooth, and sound out of the box meant I could actually use the computer to do things!
Unfortunately, it's hard to do things when the E key and the O key and sometimes the T key are prone to firing zero to three key-down events per keypress. (Though there is Unshaky.)
The hardware
I had already invested a bit in the USB-C ecosystem of chargers and adapters, and I actually enjoyed living the #onecordlife. So, my first criterion was that any laptop I bought had to have USB-C with charging support, which ruled out... most of them. I also prefer tiny laptops, since I try to get work done on flights and the tray-tables and inter-seat spacing shrink every year.
I was also already down about $1500 from the MacBook Air. It was almost my ideal laptop, except for the keyboard, so I was loath to return it. I set myself a budget of $500. I found a List of USB-C Power Delivery chargable laptops and noticed the ASUS C302CA ticked all my boxes:
- small size
- low cost
- metallic case
- backlit keyboard
- high pixel density screen (though not quite 'Retina')
The only problem is that I didn't know the first thing about Chromebooks. I knew if you customized them, you got a scary warning and it seemed awfully easy to wipe your customizations off. (It turned out not to be easy to do by accident, fortunately.)
The ASUS Chromebook Flip C302CA a.k.a. CAVE
So, I ordered one. I had mostly de-Googled my life a few years back when they wanted me to start paying for GMail. I poked around the stock ChromeOS, and was impressed with how polished it all was. (I'm kind of amazed that Google built out out an entire OS just to chip away at Microsoft's share of the low-end laptop market. There's very little evidence of the underlying Linux visible.)
The screw
The first thing I did once I was pretty sure everything was in working order was to enable developer mode (necessarily wiping the whole device). With the device off, you hold down the esc and refresh (F3) keys when you press the power button on the side. At the recovery screen, the secret Ctrl-D shortcut brings you to a prompt to turn OS verification off by pressing Enter. Do that, and after it does its thing and reboots, you'll get a scary warning screen. Press Ctrl-D here to boot into ChromeOS.
Now that I was in developer mode, Chrome let me access a shell within ChromeOS with Ctrl-Alt-T (from which I could get up to all sorts of mischief).
The next order of business was to download Mr. Chromebox's firmware utility script. Something I didn't really realize to before going the Chromebook route was how different their boot process is. Google has locked down the OS and firmware to be mostly read-only, which has obvious benefits for the integrity of the system software... but makes dual-booting a pain. Though you can reduce the number of seconds the scary warning screen displays, and change the default boot target from ChromeOS to your preferred Linux, you cannot remove it entirely. (See "Set Boot Options" on the firmware utility script page.)
Aside: dual-booting
The C302CA ships with a non-functional legacy BIOS payload, so if you want to experiment with dual booting Linux and ChromeOS, you must perform the "Install/Update the RW_LEGACY firmware" task in the firmware utility script before using something like chrx to resize the ChromeOS partition and set up another Linux.
This same Mr. Chromebox, veritable saint of the Chrome{book,box} hacking scene, has produced firmware images that replace the whole Google-y mess with Tianocore. This is the only way to remove the scary warning screen and get something like a "normal" boot process. Unfortunately, this means waving goodbye to ChromeOS and its working drivers.
To install the total replacement firmware, you must remove the screw. The C302CA has a screw bridging two pads on its PCB that the system uses to determine whether the firmware is write protected. (Or, I guess, whether the firmware write-protect can be toggled.) You have to remove all the bottom case screws to get at it, including some screws hidden under the rubber feet at the corners.
Some dude on reddit got some pictures from his brother showing where the screw is. It's almost dead center, under a bit of black tape. The most important picture is reproduced here in case that Google Photos album disappears someday.
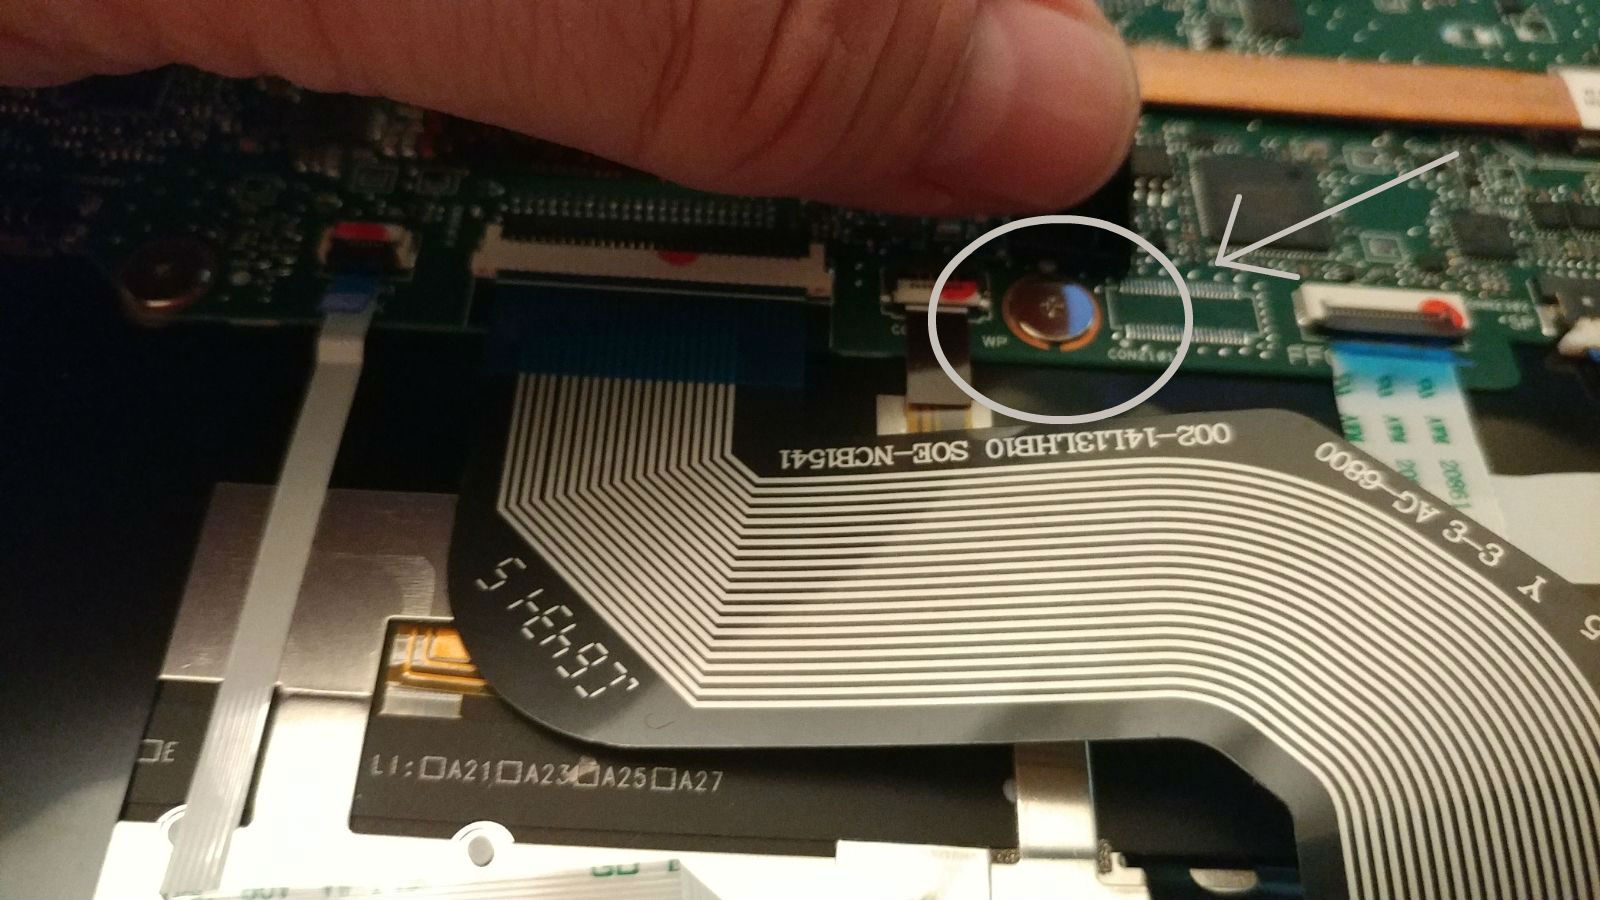 Photo credit: /u/jabyte's brother.
Once the screw is removed, booting and running the Firmware Utility Script gives the option of installing the full ROM replacement. Before blowing away the firmware I needed an OS to install after. I downloaded Kubuntu 19.04 and made a bootable USB drive from it, then went back to replace the firmware.
The install
I asked the Kubuntu installer to erase the eMMC storage and use the whole drive for an encrypted LVM volume. I also asked it to auto-login. That means I can enter a password once at boot, without having to enter it again to log in. (Something Apple has figured out, but Linux mostly hasn't. This is a bit of a hack, since it's not strictly your login password.)
The install just worked, letting me connect to WiFi to download updates and the whole bit. Of course, I knew from my experiments with various Linux distributions, Chromebook boot modes, and kernel versions that there was still work to be done.
The audio hack
The Intel systems-on-chip that are used in Chromebooks have varying degrees of support. If you're using the same kernel that came with your Chromebook's ChromeOS, you can (at least in theory) borrow all the necessary kernel patches and firmware from ChromeOS itself. The C302CA is a Skylake SoC, meaning it has had no audio support since a regression in the Linux kernel broke the ability to read Intel's binary blobs.
I found all this out by getting on the kernel bugtracker, corresponding with the bug reporter (hayato a.k.a. nebulakl) and an Intel engineer and trying out things that they suggested. Somewhat amusingly, it was not the Intel guy but rather nebulakl who established the three prerequisites required for audio support:
- You need a kernel recent enough to contain this commit, which restored the ability to parse old SoC audio "topologies"
- You need the topology file itself (md5sum: ce0e79be27a27c3b95547f3045aacabf), extracted from ChromeOS with great difficulty (or downloaded from the kernel bug tracker if you're impatient)
- You need the
v969Intel DSP firmware (md5sum: ec8d14d090393c6b0ca5257df222b243), as used in ChromeOS (see this comment)
With the advent of this discovery, a flurry of activity took place on the GalliumOS issue tracker. Specifically, galliumos/galliumos-distro#379 for "Sound on Skylake". This commit pretty well encapsulates what's needed to make it all work: af90f78ed4642b020b1a3407e14f86d94e73e988.
Of course, I'm not using GalliumOS. I wanted KDE 5 Plasma, and needed VirtualBox for work (which refused to play nicely with their kernel version, for some stupid reason that I'm sure is not their fault), so I went with Kubuntu. Fortunately, we can take inspiration from their fixes.
Part 1: Getting (and building) a newer kernel
GalliumOS applied the fix for sound on devices with old ALSA topology files by cherry-picking this commit from the kernel upstream and applying it to their copy. I accomplished the same thing by just building a newer kernel directly from source.
The steps in How to compile and install Linux Kernel 5.1.14 from source code work just as well for any version, so I used those (with some modifications).
# Install build tools
sudo apt-get install \
    build-essential \
    libncurses-dev \
    bison \
    flex \
    libelf-dev
# Download sources
curl -OL https://cdn.kernel.org/pub/linux/kernel/v5.x/linux-5.2.8.tar.xz
# Extract and change dirs
tar xvf linux-5.2.8.tar.xz
cd linux-5.2.8/
# Copy whatever config Kubuntu came with as a starting point
cp -v /boot/config-$(uname -r) .config
# Update for any new options (enter accepts defaults)
make oldconfig
# Configure to build only currently loaded modules
make localmodconfig
At this point I went and did sudo apt install qt5-default and make xconfig so I could search around for some kernel options I wanted. You can also edit the .config file directly.
I made sure to set
CONFIG_ZRAM=m
so I have the option of compressed RAM to make better use of the meager 4GB available. (sudo apt install zram-config and it should take care of the rest)
I wanted to use Vagrant / VirtualBox with NFS-mounted folders, so I needed to go enable some NFS-related options that got switched off by localmodconfig since I didn't have any NFS mounts active. (Or anyway, that's my theory.)
Now, to compile and install:
make -j 4
# wait an hour
sudo make modules_install
sudo make install
I rebooted and checked the running kernel version:
$ uname -r
5.2.8
Now all I need is the firmware blobs to make it go.
Part 2: Getting your blobs in a row
The two essential binary blobs are (as one may recall from the beginning):
- The topology file itself (md5sum: ce0e79be27a27c3b95547f3045aacabf) placed at
/lib/firmware/dfw_sst.bin - The
v969Intel DSP firmware (md5sum: ec8d14d090393c6b0ca5257df222b243) placed at/lib/firmware/intel/dsp_fw_release.bin
The GalliumOS/galliumos-skylake repository defines a recipe for a .deb package that downloads the first one, which I built myself for Kubuntu. I forked it to make some edits, such as no longer depending on other GalliumOS packages (since we're not using GalliumOS). I also ensure /lib/firmware/intel/dsp_fw_release.bin points to /lib/firmware/intel/dsp_fw_release_v969.bin, which appears to be present already on a stock Kubuntu install.
If you want to follow along at home: Make a new directory, as debuild will save the package files as siblings of the source directory, and clone my fork:
mkdir galliumos-skylake-package
cd galliumos-skylake-package
git clone https://github.com/joseph-long/galliumos-skylake.git
To build the package, you need devscripts and debhelper:
sudo apt install devscripts debhelper
To build, run
debuild -b -uc -us
(A random post on the internet told me -b builds a binary package, and -uc -us means we're not cryptographically signing it.)
The resulting .deb ends up in the parent directory, with a name like galliumos-skylake_3.0+dev1_amd64.deb.
Try to install:
sudo dpkg -i ../galliumos-skylake_3.0+dev1_amd64.deb
There's one weird thing about the install process I don't totally understand, which is that it might fail the first time if it finds something unexpected in
/proc/asound/card0/id. The correct output of/proc/asound/card0/idfor the card in ASUS C302CA issklnau8825max, but the first time I tried the install it came out asPCH. After a reboot, the correct name appeared, and I just randpkg -iagain and was able to complete the install.
As the post-install output says:
For first time audio support, you may wish to run:

    sudo skylake-audio-helper get-topology
    sudo skylake-audio-helper reset

Then reboot.
The get-topology step just copies the old ChromeOS topology to /lib/firmware/dfw_sst.bin.cros.cave, but has to download a whole recovery image to get it. If you happen to have the file already, you can just drop it in.
Now all you have to do is reboot, and you should be able to play audio out of your speakers.
The dénouement
In order for this Linux laptop experiment not to be a regression from my 2014 MacBook Air, I had a bunch of qualifications:
- Working input devices (after all, it's the MacBook Air keyboard that sent me looking for an alternative)
- Working output devices
- Good battery life
- Attractive case with good build quality
- Backlit keyboard
- mid-to-high DPI screen
- encrypted root
I regret to say I have accomplished all of these, and now I must get back to work. At least I'll have an option of which OS to do it on.