I spend most of my time working from the command-line, so being able to inspect an astronomical FITS format image in DS9 with ds9 -multiframe -zoom to fit ./thing.fits as fast as I can type it is useful to me. (Except, obviously, I have an alias for those options. I'm not an animal.)
SAO distributes X11 builds of DS9 for macOS, which I can launch from the command line, so I use those. Now, their "Aqua" builds of ds9 for macOS use the Tcl/Tk framework's implementation of the native macOS widgets (prettier!) and Finder double-click-ability (convenient!) at the cost of convenient command-line launching and, most recently, incompatibility with Dark Mode™ on macOS Monterey (disaster!).
So, I stick with the command line version. Sometimes, though, I want to open a FITS file by double-clicking it in the Finder. This is the hack I came up with to enable that.
Step 0. Get the command-line (X11) version of ds9
Go to the ds9 download page and get the appropriate X11-based release for your OS. (Confused about x86 vs. ARM64? Check the Apple menu at top left, and choose "About This Mac". If it says "Apple" next to "Chip", you have ARM64. If it says "Intel", you have x86. So, if you have an Apple chip, you want to click the link that says something like "X11 Big Sur 11.0 ARM64"--unless there's a newer version for a newer macOS by the time you're reading this.)
Extract the file, and put the contents (both ds9 and ds9.zip, not any folder they extracted into) into /usr/local/bin. (The /usr/local/bin folder is hidden in the Finder, but you can type open /usr/local/bin in the terminal to open a window there.)
Verify this works first! That means opening a terminal window and typing ds9 and waiting to make sure XQuartz starts, and the ds9 window opens, and no major errors appear in your terminal window.
Step 1. Open Script Editor
Only "applications" can open files in macOS, not dinky little "executables". So, we have to make an "application."
In your /Applications/Utilities folder, there's an app called "Script Editor". Open it up and paste this in:
on run
    process({})
end run

on open dropped_files
    process(dropped_files)
end open

on process(dropped_files)
    set file_list to ""
    if length of dropped_files > 0 then
        set parent_dir to do shell script "dirname " & quoted form of POSIX path of item 1 of dropped_files
    else
        set parent_dir to do shell script "echo $HOME"
    end if
    repeat with file_path in dropped_files
        set file_list to file_list & " " & quoted form of POSIX path of file_path
    end repeat
    do shell script "cd " & parent_dir & "; /usr/local/bin/ds9 -multiframe -zoom to fit " & file_list & " &> /dev/null &"
end process
You can tweak the options following the path to ds9 in the above do shell script line to be what you prefer. The ampersand (&) is the concatenation operator, so what we're doing is constructing a command just like the one we'd type in the terminal to launch ds9 with one or more files as arguments. The final &> /dev/null & backgrounds the process and indicates we don't care about its outputs at all, so that the script can exit without waiting for ds9. (Otherwise, you'd get an extra icon in the dock every time you launched it this way.)
The set parent_dir... line makes the working directory of the resulting ds9 process the same as the parent directory of the first file in the list to open, instead of the default (/).
Save as "File Format: Application" to create a .app bundle (I called mine ds9.app). Put it in /Applications, or where-ever you prefer.
Step 2. Edit Info.plist
App bundles are just folders, so for the next trick open ds9.app/Contents/Info.plist in a text editor. You can control-click (or right-click, or two-finger-click) the ds9 app bundle icon and choose "Show contents" to see inside and get to Contents/Info.plist. Open it in your favorite text editor for code.
Right before the final </dict>, add:
    <key>CFBundleDocumentTypes</key>
    <array>
        <dict>
            <key>CFBundleTypeExtensions</key>
            <array>
                <string>fits</string>
                <string>fit</string>
            </array>
            <key>CFBundleTypeName</key>
            <string>Flexible Image Transport System image</string>
            <key>CFBundleTypeRole</key>
            <string>Editor</string>
            <key>LSHandlerRank</key>
            <string>Owner</string>
        </dict>
    </array>
Next, save the .plist file. You can check if everything's right using plutil, e.g.
$ plutil ds9.app/Contents/Info.plist
ds9.app/Contents/Info.plist: OK
(Note: This edit should be sufficient to make the app a drop target for FITS files, but it seems like LaunchServices can get confused. You might need a magic incantation like /System/Library/Frameworks/CoreServices.framework/Frameworks/LaunchServices.framework/Support/lsregister -kill -domain local -domain system -domain user to regenerate the list of file associations.)
Double-click your app bundle to launch an XQuartz version of ds9. It might take a second. (If you just installed XQuartz for the first time at the beginning of this guide, you may even need to reboot first.)
Step 3. Update file associations (if needed)
There's probably a command-line way to do this, but right-clicking on a one .fit and one .fits file and choosing Get Info gets you the window shown below. Select your new .app under the "Open with:" section and click "Change All..." to get this prompt
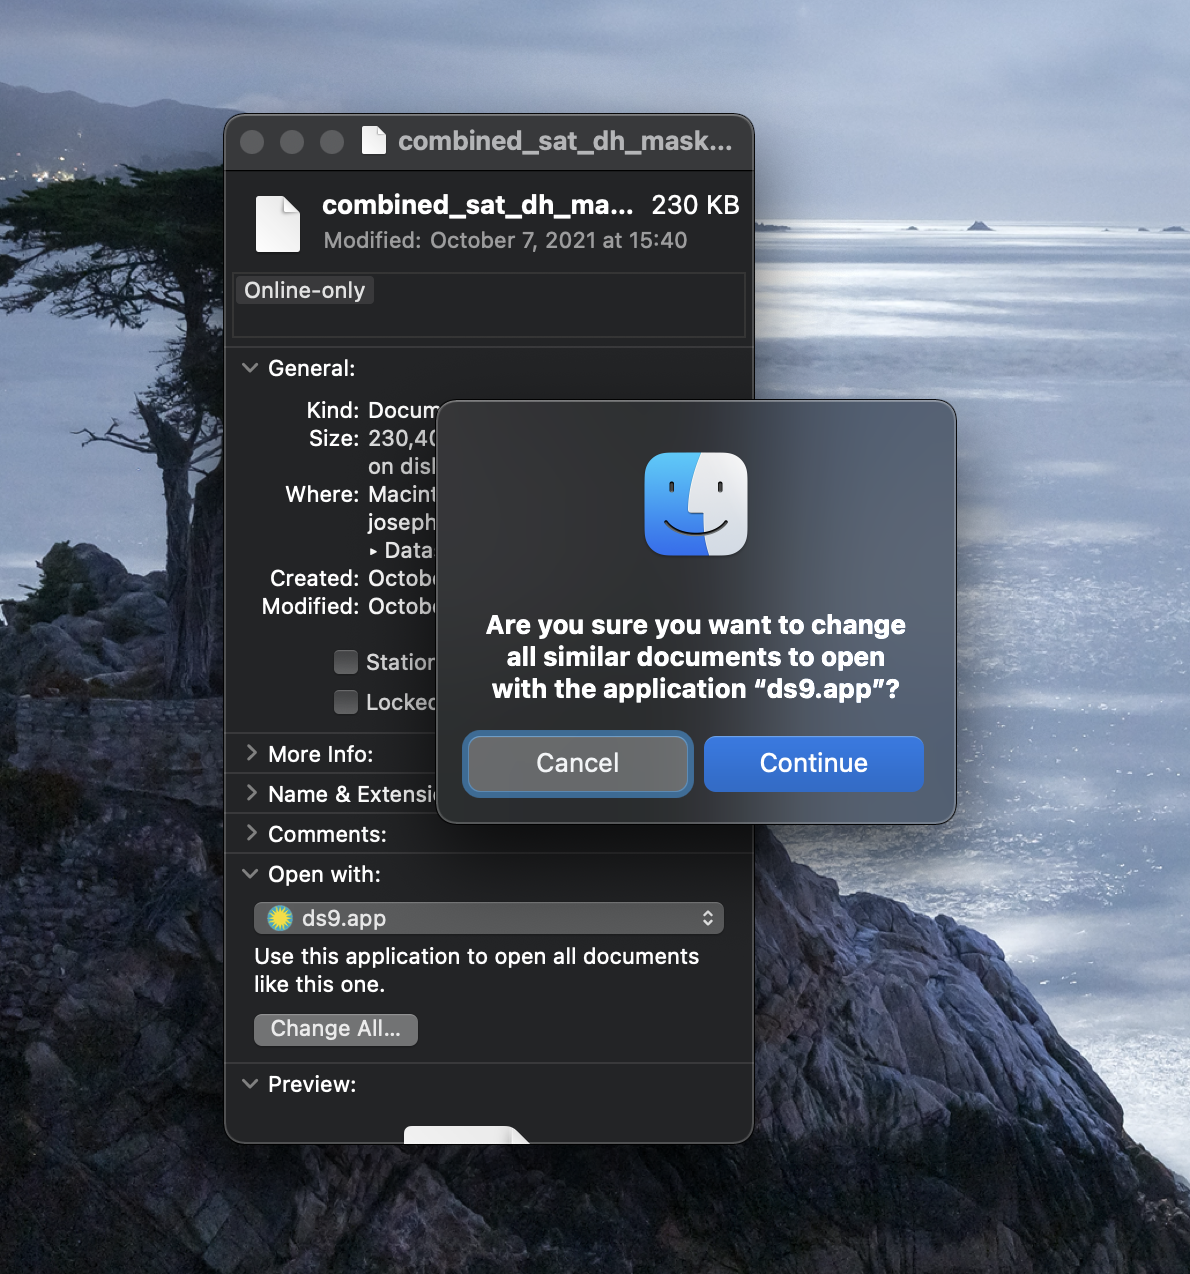
Confirm by clicking "Continue," and we're done. Now, double-clicking any .fits or .fit file should open an XQuartz ds9 window. Dragging multiple files onto the icon will open them within the same window as separate frames.
Thanks
I cobbled this together from a couple places: First, https://github.com/RichardBronosky/AppleScript-droplet, which has a more flexible solution for launching arbitrary scripts. Second, the bundle keys and values were taken from this StackOverflow answer, though it omits the fact you must include <key>CFBundleDocumentTypes</key> before the array.
Thanks to Meghan O'Brien and Avalon McLeod for feedback on an earlier version of this blog post!
Updates
2022-08-13 -- added parent_dir to script example, made path in script consistent with putting ds9 in /usr/local/bin